Tag: afternoonartist.wordpress.com

Weekend Chef: Meatball Gyros

Meatball Gyros

I love gyros so when I found this recipe for meatballs with cucumber sauce on flatbreads in the August 2012 issue of Better Homes and Gardens Magazine I just had to try it. The recipe calls for frozen meatballs, which are a real time saver for busy cooks like me. I served these Greek-style sandwiches with a tossed green salad and had dinner on the table in under 30 minutes. Delicious, easy, and quick–that’s a winning combination in my book. Get the recipe at bhg.com.

Abbott in Action

029

Here is a video of my daughter’s horse, Abbott, free lunging. Free lunging is when you put the horse through its paces around the arena without a lunge line. Abbott is trained to respond to clucking noises. So in this video when you see him stopping and then resuming his paces, my daughter is off camera clucking to encourage him to keep going. Free lunging is less stressful on the horse’s joints because you’re not constraining him to a small circle when he’s moving. Abbott is a 2005 quarter horse/paint gelding. His shire was a western pleasure champion, which is apparent in his movement. My daughter enjoys showing him in huntseat equitation. Abbott is the apple of her eye.

And here is a picture of me riding Abbott. I enjoyed horseback riding at a place called Patty’s Riding Stable in Fairfax, Virginia in the early 1970s. Back then it cost $3.00 per hour to ride the horses. I diligently saved my weekly allowance (.50 cents per week), and when I had accumulated enough money, I’d go for a ride. I had no idea what I was doing but I didn’t care, I had fun anyway. Apparently the horses knew I was clueless because one Chestnut mare named “Chessie” would slam me into the corner of a barn filled with grain every time I rode by it in an effort to knock me out of my saddle. I had to take my foot out of my stirrup and push off against the building with my foot to keep her from body slamming me against the side of the building. Somehow, I always managed to hang on. When this photo was taken, I hadn’t ridden a horse in over 30 years. It felt so much higher up there in the saddle than I remembered, and I was initially quite nervous. Abbott was very patient with me.

Me Riding Abbot2

Bacon, Egg, and Potato Salad

Bacon Egg and Potato Salad1

This bacon, egg, and potato salad is one of my daughter’s favorite salads. It’s my variation of a spinach salad with a hot bacon dressing that my mother served years ago. This salad, however, is served cold and I’ve removed the bacon grease from the dressing. The end result is a sweet and sour, crunchy salad with a feather light dressing that’s truly a party in your mouth. This salad is a bit more time consuming to prepare than most salads since you’ll need to boil the eggs and potatoes and fry the bacon, but it’s well worth the extra effort. Give it a try and let me know what you think.

Here are the ingredients you’ll need to make bacon, egg, and potato salad:
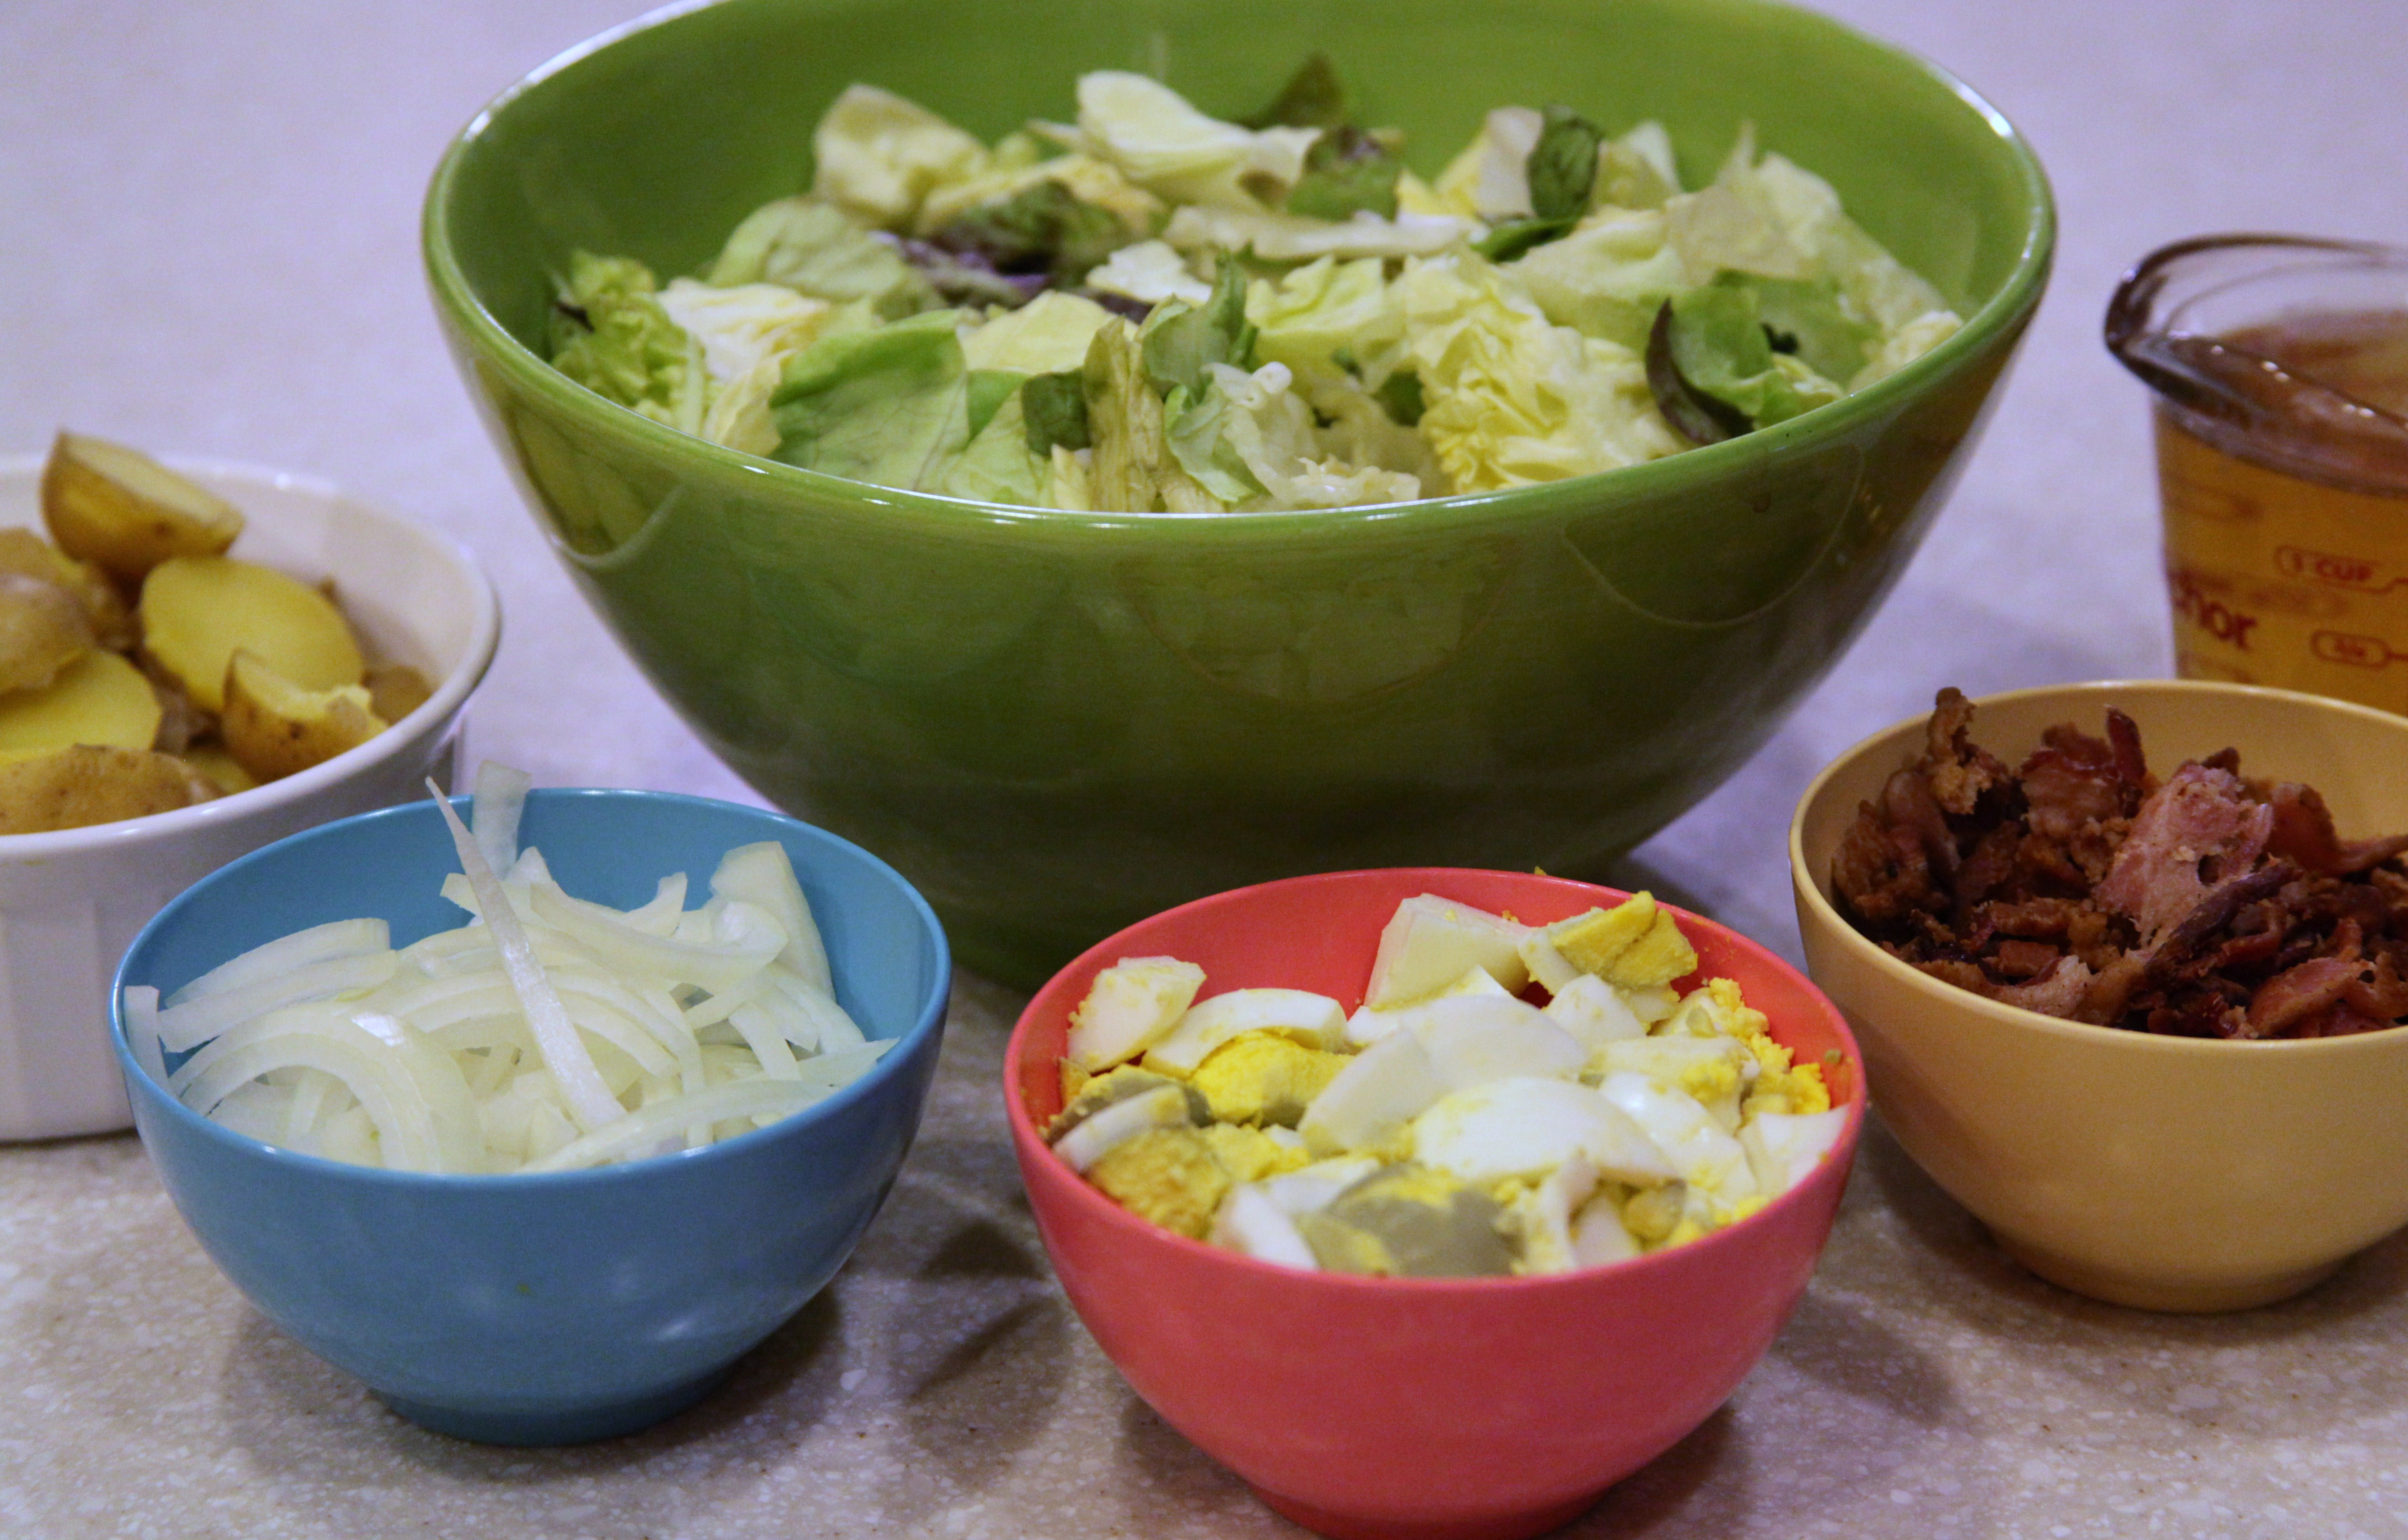
Bacon Egg and Potato Salad Ingredients

Ingredients:

1-2 heads Boston (or butterhead) lettuce, washed and torn into bite-sized pieces
1 medium onion, sliced
1 lb. bacon, cooked and crumbled
6 hard-boiled eggs, chopped
6 Yukon gold potatoes, boiled and sliced (I don’t peel them)
1/4 cup apple cider vinegar
1/4 cup seasoned rice vinegar
1/2 cup sugar
1/2 cup water

Combine the lettuce, onion, crumbled bacon, chopped eggs, and sliced potatoes in a large bowl; set aside. In a medium saucepan, combine the cider vinegar, rice vinegar, sugar, and water. Cook over low heat until the sugar is dissolved. Cool completely and pour over the salad.

Doesn’t this look good?

Bacon Egg and Potato Salad2

One-Year Anniversary

One-Year Anniversary

February 18th will mark the one-year anniversary of my blog. Since I began this blog to share my efforts on learning how to paint with watercolors, my daughter, Greta, thought it would be a good idea to repaint our first painting and share the results here. We’ve developed a lot of new skills in the past year–and I’ll share some lessons learned in an upcoming post–but we still have a lot to learn. Our plan is to repaint this little lion–which we intentionally kept simple since it was our first effort–each year on our anniversary to show our progression.

My blog has grown into much more than an art blog over the past year. I’ve also branched out and included posts about the things I love most–art, cooking, interior design, gardening, and spending time with my family and animal friends. Life is good, and I’m pleased to share the goodness with you. I’d like to thank my loyal followers and readers for all their encouragement and lovely comments over the past year and I hope to continue to share all the goodness life has to offer.

Three Women and a Pineapple Upside Down Cake

Pineapple Upside Down Cake

This is a pineapple upside down cake fresh out of the oven. My mother made it as a treat today for me and my daughter.

Pineapple Upside Down Cake Half Eaten

And this is the same cake 10 minutes later. Boy was it good; so good I have to share the recipe. Here are the ingredients you’ll need to make old-fashioned pineapple upside down cake.

Ingredients

2 1/2 cups flour
3 teaspoons baking powder
1/4 teaspoon salt
1/2 cup vegetable shortening
1 1/2 cups sugar
2 large eggs, beaten
1 teaspoon vanilla extract
1 cup milk
1/4 cup butter, melted
1/2 cup light brown sugar, firmly packed
9 whole pineapple slices
12 maraschino cherries
12 pecan halves

Mix flour, baking soda, and salt. Set aside. Cream shortening; gradually beat in sugar. Add eggs and vanilla; beat thoroughly. Add flour mixture alternately with the milk. Melt butter in the bottom of an oven-proof fry pan. Add brown sugar and spread evenly on the bottom of the pan; bring to a boil, stirring until the sugar dissolves. Remove from heat. Arrange pineapple slices with a cherry in the center of each slice and additional cherries and pecans between the pineapple slices. Pour cake batter on top of the pineapple mixture. Bake at 325 degrees for 45 minutes or until a toothpick inserted in the center of the cake comes out clean. Cool for 5 minutes. Loosen sides of the cake from the pan with a knife. Invert onto a serving plate.

Daisy Chain Fairy

Daisy Chain Fairy

This little daisy chain fairy is a bit of a departure for me since I typically work with cool colors. I had to adjust the colors several times before I was satisfied with my color choices. I may rework her in pink tones instead of orange, but for now I’m calling her done. This painting is based on a tutorial in Linda Ravenscroft’s book, “How to Draw and Paint Fairies.”

Skillet Steak and Corn

Skillet Steak and Corn

When I’m short on time I often reach for this recipe for skillet steak and corn. It’s delicious, easy to prepare, and uses ingredients that are readily available in my pantry. I found the original recipe in Taste of Home magazine, but I’ve made a few changes over the years. Here are the ingredients you’ll need to make skillet steak and corn:

1 lb. skirt steak cut into strips
1 medium onion, cut into wedges
2-3 garlic cloves, minced
1/2 teaspoon dried thyme leaves
2 tablespoons oil
1 cup beef broth
1/3 cup red wine (I used merlot)
1 can (14 oz.) diced tomatoes
1 can (15 oz.) whole kernel corn, drained
Hot cooked rice

In a skillet brown the steak, onions, garlic, and thyme in oil. Add the beef broth and wine; simmer for 10 minutes, or until the liquid has evaporated. Stir in tomatoes; cover and simmer for 15 minutes longer. Add corn; heat through. Serve over hot cooked rice.

How to Make a McCafe Frappuccino at Home

Make-at-Home McCafe Frappuccino1

In November I shared my recipe for how to make a McDonald’s McCafe iced mocha at home. Yesterday, my daughter asked me to duplicate her favorite McCafe drink–a mocha frappucinno. She really loves this frozen drink, and I wanted to duplicate it as closely as possible, so I bought a McCafe mocha frapp to use as a taste comparison and got to work. It only took me one attempt, plus a few adjustments, to come up a recipe that tastes very close to the original.

The same ingredients are used to make both McCafe drinks, but the proportions and preparation are different. Here are the ingredients you’ll need to make a home-made McCafe mocha frappuccino:

Iced Mocha Ingredients

Ingredients:

1 tablespoon Starbucks Via iced coffee mix
3 tablespoons heavy whipping cream
3 tablespoons chocolate syrup
1 cup water
2 cups crushed ice
Canned whipped cream

Combine the Starbucks Via coffee mix, heavy whipping cream, chocolate syrup, water, and ice in a blender. Blend until slushy. Pour about one tablespoon of chocolate syrup in the bottom of the glass, add the frozen drink mixture, top with whipped cream, then drizzle with chocolate.

Now you can enjoy your favorite McCafe iced coffee treats from the comfort of your own home, plus it’s cheaper.

Winter Mice in Watercolor

Winter Mice1

I thought it was time to expand my horizons and paint subjects other than flowers and fairies so I gave these cute little winter mice a try. This painting is based on tutorials in Linda Ravenscroft’s book, “How to Draw and Paint Fairyland–A Step-by-Step Guide to Creating the World of Fairies. This comprehensive book not only shows readers how to paint fairies but also their environment and a host of other creatures–like these adorable mice. You don’t have to be a fan of fairies to benefit from the instructions in this book; there’s something for everyone wanting to improve their painting skills.

%d bloggers like this: