Month: October 2013

Fall Fairy in Watercolor

fall fairy painting in watercolor

Today is a spectacular fall day with crystal clear blue skies and temperatures in the high 70s–not too hot, not too cold–just the way I like it. The leaves are just beginning to change colors and I can’t wait to see the show. All this fall goodness got me in the mood to paint something with a fall theme, so I whipped up this colorful fall fairy complete with a magic wand and pumpkins just waiting to be turned into Cinderalla’s coach. Now All she needs is some white mice to be turned into horses, and away she’ll go to meet prince charming.

This painting is based on a tutorial in Linda Ravenscroft’s book, The Fairy Artist’s Figure Drawing Bible. I’ve learned so many new painting techniques from the tutorials in this book. It was definitely money well spent.

A Purple Christmas Wreath for My Front Door

Purple Christmas wreath for my front door

You’ve all seen my purple front door, right? The one I painted for my purple summer front porch makeover? Well, what do you do with  a purple front door when Christmas rolls around and all the holiday finery is typically red and green? Paint it? Nah. Embrace it!

This is what I’ll be hanging on my purple front door over the Christmas holiday–it was a special order from TwoInspireYou’s shop at etsy.com. Isn’t it gorgeous and totally unique? Now all I need to do is find some silver sequined pillows to adorn my purple chairs and add some gem tone rugs on the porch and I’ll be sporting a totally unique holiday look. What do you think about this look? Fabulous or too unconventional?

Here’s another pic:

Purple Christmas wreath

Asiatic Lily in Watercolor

Asiatic lily

My daughter painted this beautiful yellow Asiatic lily during a recent mother/daughter painting session. We haven’t painted together in a while, so it was nice to have my favorite painting partner join me for an evening of painting, small talk, and pumpkin lattes. To create the background texture, she sprinkled sea salt on the paint while it was still wet. It adds a lot of interest to an otherwise very simple painting.

As usual, she completed her painting first, so I’ll be showing my latest painting as soon as I finish it.

Amish Onion Bread

Amish onion bread

Hi, everybody, how’s your weekend going? It’s been cold and rainy here for the last four days so I’ve been occupying myself by trying some new recipes. I made Amish onion bread and served it with my almost home-made vegetable soup. It was so delicious that I have to share the recipe. It makes a huge loaf so serve it when you have a big crowd or cut the recipe in half. Get the recipes for Amish onion bread and almost homemade vegetable soup here and here.

Almost homemade  vegetable soup

Pink Lilies in Watercolor

Pink Lilies in Watercolor

Pink Lilies in Watercolor

The gorgeous gold tone on the flower buds and stems is green gold by Winsor Newton–one of my favorite colors. It looks fabulous paired with the pink and coral tones in the flowers. I painted the veins on the leaves with white acrylic ink and a Number 1 round paint brush. This painting is based on a tutorial in Fiona Peart’s book, “Vibrant Flowers in Watercolor.” It’s a great book for beginning–or seasoned–watercolorists. Watercolors and acrylic ink on cold pressed Acquarello Artistico paper by Fabriano.

Here are some close-up views:

Pink lilies in watercolor - closeup view

Pink lilies in watercolor--close up view

One Rotisserie Chicken, Three Easy Meals

One chicken--three quick meals

There’s nothing I like better than a roast chicken dinner with all the trimmings–mashed potatoes and gravy, cornbread stuffing, a side vegetable, and cranberry sauce. But I rarely have enough time during the week to prepare a big meal from scratch. So I often rely on rotisserie chicken and pre-cooked side dishes to get dinner on the table in a flash. Rotisserie chicken is convenient and economical–one bird can yield several meals. This week I prepared three meals from one chicken. Here’s how I did it:

Dinner No. 1–Lazy Cook’s Chicken Dinner

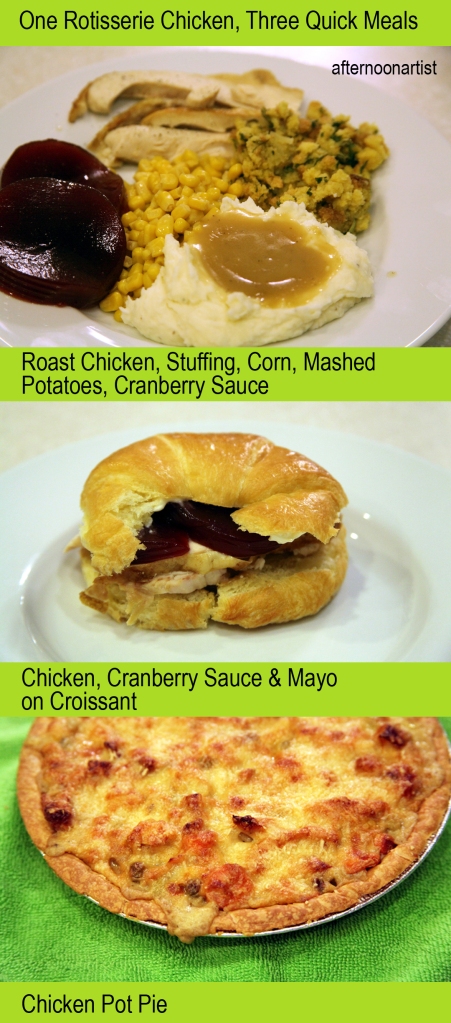
For this meal I microwaved the chicken until it was heated through (~ 5-6 minutes), microwaved a container of ready-cooked mashed potatoes, prepared cornbread stuffing using the microwave instructions on the side of the box, and opened a can of vegetables and a jar of chicken gravy, poured them into saucepans, and heated them through. Finally, I opened a can of jellied cranberry sauce and sliced it. For this meal I was keeping it real–really easy, that is.

Dinner No. 2–Lazy Cook’s Chicken Sandwiches

On day two, I sliced some croissants and topped them with slices of leftover chicken breast that I warmed in the microwave, and topped that with mayonnaise, leftover sliced cranberry sauce, and salt and pepper. I served this meal with fresh fruit and iced tea. Easy, peasy.

Dinner No. 3–Not-So-Lazy Cook’s Chicken Pie

This meal features all the leftovers from Day 1’s meal–chicken, mashed potatoes, gravy, vegetables, and stuffing (yes, it’s in there), plus a few additional ingredients. This dish is more time consuming to prepare than the others, but it’s well worth the effort. Here’s what you’ll need to make a chicken pie:

  • 1 cup celery, chopped
  • 1 cup onion, chopped
  • 1 cup carrots, peeled and sliced
  • 1 cup potatoes, cubed (no peeling necessary)
  • 1/2 cup butter
  • 1-2 cups de-boned chicken
  • 1 1/2 cups chicken gravy (or chicken broth)
  • 1 1/2 cups half-and-half
  • 1 cup mashed potatoes
  • 1-2 cups cornbread stuffing
  • 1 cup vegetables (corn, green beans, or peas)
  • 2 tablespoons sugar
  • 1 teaspoon salt
  • 1/2 teaspoon poultry seasoning
  • 2 frozen pie shells
  • 2 cups Asiago cheese, shredded

In a large skillet, saute the celery, onions, carrots, and potatoes in butter over low heat until soft (about 10-15 minutes), stirring occasionally so the vegetables don’t brown. Stir in the chicken, gravy (or chicken broth), half-and-half, mashed potatoes, stuffing, vegetables, sugar, salt, and poultry seasoning and heat through. Pour into two frozen pie shells, top with shredded Asiago cheese, place on a cookie sheet, and bake in a 400° oven for 30 minutes, or until the pie crust and cheese are golden brown. Serve with a tossed green salad.

Work in Progress–Black Capped Chickadee in Colored Pencil

black-capped chickadee

I thought it was about time that I posted something other than a watercolor painting. I picked this project from a book that I bought way back in 1998–Painting Garden Birds with Sherry Nelson–but never used. The book offers a series of lessons in oil painting but since I no longer have any oil paints laying around the house, I gave it a try with colored pencils. Prisma Color and Verithin colored pencils on gray Canson Mi-Teintes pastel paper.

Fireplace Makeovers–One Fireplace Three Ways

Navy blue fireplace makeover

Aqua fireplace makeover

Fireplace makeover in light blue

I’ve been hard at work overhauling my blog this week to make it more user friendly and give it a fresh new look. What do think of my new design? I’m really liking the touches of fresh lime.

While going through old posts I found these photos of my fireplace featuring several different shades of blue and thought I would share them today. I frequently repaint my rooms. Repainting a room is one of the most economical decorating tricks up a decorator’s sleeve. The change is always dramatic and all it takes is one afternoon of work and about $150.00 per room.

Which color is your favorite, the navy, the aqua, or the light blue?

Poppies in Watercolor

poppies in watercolor

Keeping things simple today. No shading, no fancy watercolor tricks, just plain, solid color on a white background. The keep-it-simple (KISS) rule always works. This painting–which was inspired by a pillow case that caught my sister’s eye–is for my sister’s new home. She wants to add a touch of orange in every room, and I’m happy to oblige. I can’t wait to pull up a chair and have a cup of coffee with my sissy in her new kitchen.

What’s Cooking–Cheeseburger Rice

Cheeseburger rice recipe

I love cheeseburgers. I mean, who doesn’t love a good burger? I like mine served on a potato bun topped with mayo, ketchup, lettuce, tomato, and onion. Sometimes, I prefer to keep things simple and top my burger with just a squirt of ketchup and yellow mustard. Other times, I like to recreate a favorite fast food burger, like this copycat Roy Rogers Double-R-Bar burger.

When it comes to cheeseburgers, I also like to think outside the bun. This cheeseburger salad is one of my favorites. So is this recipe for cheeseburger rice. The original recipe was created by Kraft foods, but I’ve adapted it to suit my taste. Adults like it, kids LOVE it, it takes just 10 minutes to prepare, and clean up is a breeze–there’s only one skillet to clean. Here’s what you’ll need to make cheeseburger rice:

Ingredients

  • 1 medium onion, peeled and chopped
  • 1 lb. lean ground beef
  • 1 3/4 cups water
  • 1 cup ketchup
  • 2 heaping tablespoons prepared yellow mustard
  • 2 cups instant white rice
  • 1 cup shredded cheddar cheese

Directions

In a large skillet, brown meat and onions over medium heat; drain. Add water, ketchup, and mustard. Stir in rice. Sprinkle with cheese; cover. Cook on low heat for 5 minutes, or until the rice is tender.

%d bloggers like this: